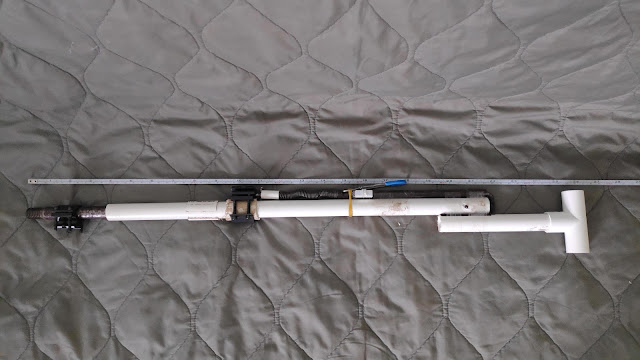
Home made 22lr zip gun, but it's also an accurate sniper/survival rifle
I'm sure we all heard about zip gun. A small pen or tubular shape firearm. Though their design purpose are meant for close range shooting or assassinating. It's a miracle if you can hit a human target past 10 meters!
What if I tell you, I made a zip gun that's actually a rifle, and can hit a melon at 100m?
Back ground story:
The design must satisfy these criteria:
- It must be a pullpup, can be taken down to fit in my backpack, so I can take it on the trail with me
- It shoots 22lr. I'm currently have a barrel and about 100 rounds of it
- Simple to make - This is the most important as I don't have access to heavy machinery like Lathe, Drill Bench, Milling Machine or Bench Saw. I must find a way to create the parts with crude tools. Utilizing alternative material (Plastic, Rubber,...) other than metal whenever I can. Because cutting a PVC tube is of course, much easier than cutting a steel one.
Designing:
Then I realise the material doesn't have the mechanical properties (too soft, easy to break, or too hard for the dremel and the hand drill to punch through) then I have to scrap it and find another one. All this make designing phase took the most time in every single project.
Let's start from the breech. It made from a 7mm round stock bar. With a slot for the firing pin to sit in.
Another slot perpendicular for the wedge (in green). This wedge will hold the breech assembly together, and keep it from flying backward from the recoil for the shot.
The wedge extend out to the receiver. This keep the whole breech assembly and the receiver together. A single pin also simplify disassembly process. No tools required
Firing mechanism is a simple striker fire system, with the trigger located in front of the chamber (pullpup style). This greatly reduce the overal length of the weapon
Now that we have our design, let's bring it to life.
Execution
Raw material. Note that the 3mm nail is for the wedge, not firing pin!
Breech face
Breech sleeve (Idk what to call it)
Firing pin
Made from a 2.5mm diameter nail. The back must be filed down to fit into the breech assembly.
The striking face of the pin is tricky. Too large of a striking surface and there won't be enough pressure to set off the primer. Too small and you might miss the rim. I went through 7 nails to get it just right.
The firing pin also got heat treated. I heat it up til red hot with a torch, then quench it in cold water. This will help it retain the hardness and prevent deformation
Breech assembly
A shorter firing pin will work better, as it won't protrude pas the outter sleeve edge. Thus won't damage your barrel when dry fire. But this is good enough for me.
Firing pin test
I stacked a spent cartridge and the breech on top of a dowel then tap the pin. The indentation on the cartridge shows good primer impact.
Now that we're done with the most difficult part, let's continue to the next.
Receiver
The receiver is simply a pipe that has a hole drilled through it. I decided to go with a PVC pipe, because that's what I have in my tool box
And the breech assembly goes in
Firing Mechanism
Although look rusty and disgusting, this is what I have in the pile of old stuff. And begger can't be choser.
The hammer is hot glued to the striker. This is only a temporary so that I can quickly have a working system. Holidays are going by fast and I don't have much time left.
Trigger made from a clothing hanger. With steel wire in the middle to give leverage.
My spring is a little short. So I added a little tube to achieve maximum spring compression
Put everything together and finishing up
The firing mechanism is taped to the receiver, along with a shoulder stock make from the same pipe.
Overal length of this rifle is around 65.5cm with a barrel length of 50cm.
The action doesn't have any locking mechanism. The mass of the long barrel will have enough inertial to keep the breech closed during fire.
However pointing the muzzle downward would drop the whole barrel on the groud. So a rubber band is used to keep it in place
Does it work?
At first I was also skeptical about the PVC strength. But in the end, it handle the 22lr cartridge like a champ
Final result
Despite the PVC can handle the 22lr recoil, mounting a scope on it wouldn't make any sense since it lacks rigidness to hold zero. Maybe I'll switch to a metal tube receiver in the future.
A loading/ejecting port along with an extrator would be a nice touch. But that's for a future upgrade


Comments
Post a Comment